
In the realm of talent acquisition, visual storytelling has become an indispensable tool for engaging candidates and showcasing company culture. In today’s digital landscape, smartphones have emerged as versatile instruments for capturing compelling moments and crafting impactful narratives. Among these devices, the iPhone stands at the forefront of mobile cinematography, offering a plethora of features to elevate your video content to professional standards. Whether you’re a recruiter, employer brand strategist, or HR professional, mastering the following iPhone camera settings can significantly enhance the quality of your recruitment videos:
1. Switch to 4K Resolution
This tip is a big must to ensure a noticeable difference in quality.
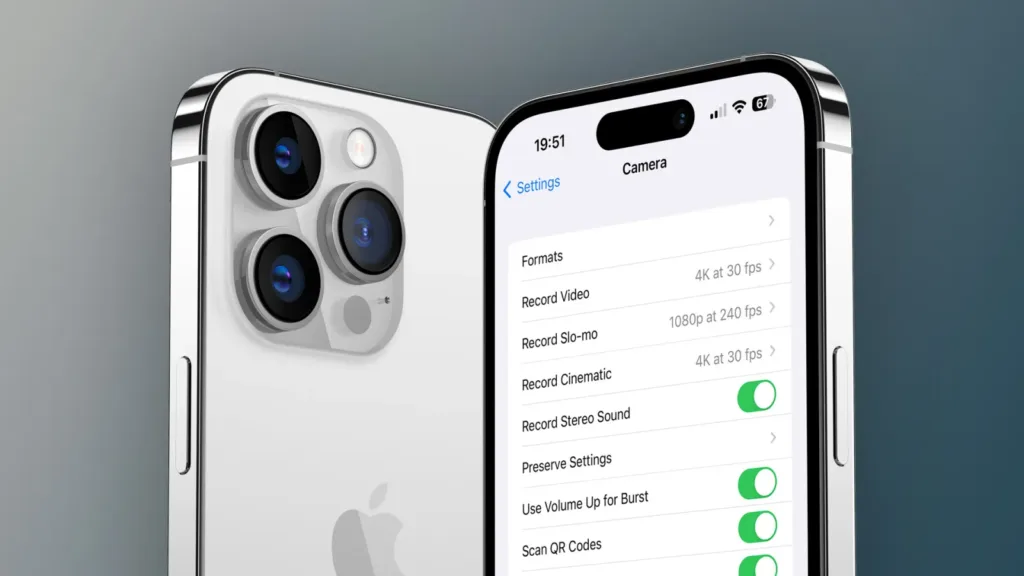
The newer iPhone models come equipped with the ability to record in 4K resolution. This advanced video setting offers four times the detail of 1080p HD video. Switching your iPhone’s camera to 4K resolution can significantly enhance your videos’ clarity, sharpness, and detail. This transformation will provide your footage with a professional-grade look and feel, making your content stand out on platforms like Instagram or TikTok.
Whether you’re documenting a fun company work event, capturing b-roll, or filming for testimonials, the 4K setting will capture every scene in stunning detail. Open the Camera app, switch the camera mode to Video, and look to the corner of your screen. If you’re shooting in 1080p, you’ll see an HD label. Just tap HD to switch to 4K video.
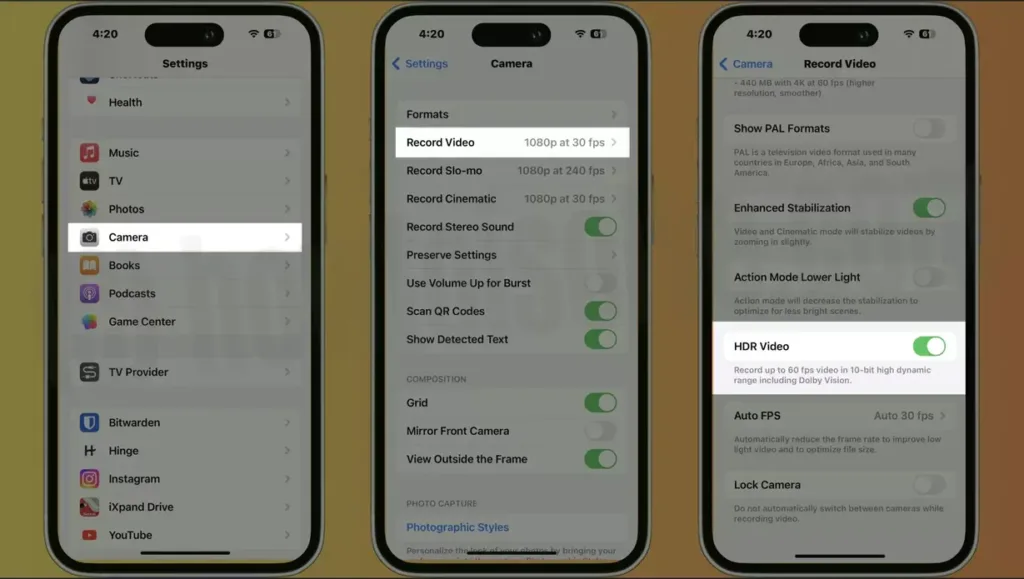
2. Disable “HDR Video”
HDR video can enhance image quality, offering brighter highlights, vibrant colors, and a greater range of tonal details. However, this enhancement is most noticeable in particular scenarios, like capturing scenes with dramatic contrasts between light and dark areas.
While this might suggest that constantly activating the HDR Video feature is the best choice, it’s important to note that its usage may lead to unintended outcomes in specific contexts. HDR can sometimes cause colors to appear overly saturated or unnatural, especially in conditions that don’t call for high-contrast enhancements. At times, the picture often looks pixelated and overcompensates movements.
Therefore, disabling the HDR Video feature when recording videos on your iPhone is often recommended to ensure color consistency and maintain a natural aesthetic throughout your footage.
3. Enable the Grid
When you’re filming videos, one feature that you might not have explored yet, but should definitely get familiar with, is the “Grid” function. This handy tool displays a grid overlay on your screen while shooting videos when activated. Trust me, it’s more than just a bunch of intersecting lines.
This grid is based on a principle in photography, and videography called the rule of thirds. If you’re new to this, the rule of thirds is a simple yet effective composition technique that can transform your shots by dividing your frame into nine equal sections by a set of horizontal and vertical lines.
But how does this help you? You can create a more balanced and engaging shot by positioning your main subject or essential elements along these gridlines or at the intersection points. This technique is often used to guide the viewer’s eye and create a sense of depth and dimension in the scene.
4. Disable “View Outside Frame”
I get it–distractions are the last thing you need when you’re in the zone and trying to capture the perfect shot. That’s where your iPhone’s “View Outside Frame” feature comes into play. Though it can be helpful in certain situations, there are times when it might be more of a hindrance than a help.
When enabled, this setting allows you to see what’s just outside the frame of your video on your screen. While it can be handy for planning your next camera move, it might also pull your focus away from the main subject of your video. When you really want to zero in on your subject and remove any potential distractions, try turning off the “View Outside Frame” option. This way, your screen will only display the exact frame the camera captures, helping you stay focused on your subject. It’s like putting blinders on a horse—it allows you to concentrate fully on what’s ahead.
5. Enable Stabilization
As much as we all wish we had the steady hands of a seasoned cinematographer, the reality is sometimes our videos can look a bit more like a roller coaster ride than we’d like.
The stabilization feature works its magic to minimize camera shake and deliver smoother, more stable video footage when enabled. Picture it like having an invisible assistant who helps hold your camera steady, smoothing out accidental bumps or wobbles that could otherwise make your video feel shaky.
Basic Shooting and Exposure Techniques
Great videos don’t stop at the setting menu. Take a step beyond the basics and add additional help with popular accessories or tips.
Lighting
Let’s talk about your lighting game. It’s important always to stay aware of your surroundings and the lighting conditions. Seek out well-lit environments, or don’t hesitate to bring in artificial lights when needed. Beware of those sneaky bright light sources that could cause overexposure or cast harsh shadows— they’re more trouble than they’re worth.
Composition
Next, let’s get artsy with composition. As you frame your shots, keep the rule of thirds in the back of your mind. Think of your screen divided into a three-by-three grid, and try placing your subject off-center— trust me, it can make your composition more visually appealing.
Now, let’s get sharp with focus. Make sure your subject isn’t just part of the scene but the star of it. A simple tap on your screen can put them in the spotlight. Want to keep them there? Just press and hold until the AE/AF Lock indicator shows up. It’s like giving your subject a VIP pass to the in-focus party.
Better Exposure
Keep your video’s brightness in check by manually adjusting the exposure. Just tap on your screen and slide that exposure control up or down. It’s particularly handy when lighting conditions start to flip flop.
White Balance
Finally, let’s talk about setting the mood with a white balance. It’s all about matching your video’s colors to the lighting conditions. While the Auto setting can be your go-to for most situations, don’t shy away from manual adjustments when you need more control over the color temperature. It’s like being a painter, but with pixels.